

Local Separations
FFQ Chalons
1855 - 1873
Local Separations
It is very apparent from studying the printing plates that there were no plans to perforate the sheets of New Zealand Chalon stamps using a mechanical means, and as a result the finished plates were not of the standard achieved with the 1d and 2d stamps of Great Britain. The spacing and alignment of the 240 individual stamp images were very irregular and this made all attempts at separations very difficult. The Hausberg reprint sheet below shows the challenges those meaning to separate the individual stamps would face, especially on the vertical axis.

However separate them they must, and so various techniques were employed by different folks across the NZ Post Office fraternity in different locations. These are often called 'Experimental Separations' but Bob Odenweller in his excellent book 'The Postage Stamps of New Zealand: 1855 - 1873' highlights the fact that they weren't experimental at all but just attempts at local post offices to find an effective separation technique.
The obvious first choice was scissors, and this was quickly followed by various roulettes or serrates with each Post office having its own preferences. Straight edges were used with which to guide the tidy ripping of stamps into strips and even singles. Perforations were first employed in Otago where the gold rush and hence the population explosion meant that communication from the area also exploded, thus requiring access - fast access - to stamps. And finally a more centralised approach to perforating stamps was sponsored by the Post Office itself, although even this approach had its variations and foibles.
Let's take a look at some of the local separations used.
Scissors
Although somewhat obvious in nature, it must be stated that scissors were used to cut stamps from the sheets. However one technique was to cut complete strips and and then cut vertically almost all the way through to within a few mm. In this way the stamps could be easily stored and ripped off as required. Below a pair of Dvies 2d Blue and a single 2d Blue on blue paper showing ripped remnants. Interesting that it was with the 2d blue that I found most examples of this separation method because this was the high volume stamp of the day, so maybe this method was used more for this stamp?

*1862 2d blue SG39 worn plate pair with scissor cut facilitating separation. Odenweller certificate stating as such.

1855 2d Blue on blue paper showing scissor cut on right with remnant of rip upper right
Straight Edge
Another method of separation seldom discussed was the use of a straight edge. Usually steel, the straight edge was placed on the sheet and and then the sheet manipulated to tear along the guttering between stamps. This left a roughish but straight edge to stamps which is not uncommon.
Below are copies of Davies 1d, 2d and 3d stamps with the rough edge created by a tearing motion against a straight edge. Sometimes the stamps were torn into strips and then cut as requested as can be seen by the image of the 2d blue below.


Roulettes and Serrates
A roulette type separation on postage stamps is very simply defined as “a cut or series of cuts which are produced without removing any portion of the paper and which provide a means of easy separation of the stamps”.
The tools required to roulette stamps were commonly in use with dressmakers and bookbinders. Some leather workers also used similar tools in those days. The two images below give an idea of the tools - cutting wheels on the end of a handle. The blades were in constant need of sharpening and so explain why the roulettes found on chalons are not consistent. There were also various cutting dimensions hence the different types of separations found. Although the roulettes are all categorised separately by location, and of course by cutting template, the idea being used in the different locations was fundamentally the same.
For more detail read Chapter 10 of the John Watts and Tom Lee book.


'Roulette 7' of Auckland
There were a number of different roulettes but by far the most common were the roulette 7 of Auckland on Davies Large Star watermark paper.
Below are the current holdings of 'The Collection'. Roulettes on one or two sides are more common than roulettes on all four sides, which are very rare. Because of their rarity the price they fetch can be considerably higher than for just imperf copies, so many a scoundrel has attempted to fake the separations by adding roulettes later to genuine non rouletted stamps. This then has necessitated the requirement to get stamps expertised so you know you have the real deal. Hence I have included all of the certificates for those stamps that I have to remove most doubt as to their genuine character.
I also love this aspect of collecting for a couple of reasons. There is a lot of history in some certificates. Some of the greatest collectors ever have submitted stamps to be expertised and this means many certificates carry their name. It's great to own a stamp once owned by some of the greats. It also adds a flavour when buying uncertified stamps and then submitting - will it pass!? 'The Collection' has a pretty solid sample of those stamps submitted that have not passed the process. Take a look here!


*1862 Davies print 1d orange vermillion
Roulette 7 SG47

1862 Davies print 1d vermillion
Roulette 7 SG48


*1862 Davies print 2d deep blue
Roulette 7 SG49


*1862 Davies print 2d pale blue
Roulette 7 SG51


*1862 Davies print 3d brown lilac
Roulette 7 SG52


*1862 Davies print 3d brown lilac
Roulette 7 SG52. Note the internal roulettes across the top


*1862 Davies print 6d Black-brown
Roulette 7 SG 53.


*1862 Davies print 6d Black-brown
Roulette 7 SG 53.

1862 Davies print 6d Black-brown
Roulette 7 SG 53


*1862 Davies print 6d Brown
Roulette 7 SG 54


*1862 Davies print 6d Red-brown
Roulette 7 SG 55

*1862 Davies print 6d Red-brown
Roulette 7 SG 55


*1862 Davies print 6d Red-brown
Roulette 7 SG 55

1862 Davies print 6d Red-brown
Roulette 7 SG 55


*1862 Davies print 1/- Green
Roulette 7 SG 56


*1862 Davies print 1/- Yellow-green
Roulette 7 SG 57


*1862 Davies print 1/- Deep-green
Roulette 7 SG 58
Serrate 16 - 18 of Nelson
The origin of stamps listed as gauging 16 to18 is obviously Nelson (current research indicates that a descriptive term of 16 – 20+ may be more appropriate). The early Nelson obliterator, Perkins Bacon type Nos 14 and 15, and later provincial date stamps clearly show Nelson as the source of these varieties. There are examples known on all four values of the Richardson printing and on all values of the Davies printing other than the 4d, the Davies printing 1/- value on Large Star watermark paper is undoubtedly the rarest of them all.
This fact is an additional pointer to the use of both these tools in the Nelson office of a Government Department. The business of these Departments was essentially on local issues in the 1862-64 periods, (Land Survey, Registration and Duties etc), and as such they would have little reason to send mail overseas.


*1855 2d Deep blue
Serrate Perf 16-18
SG 67e
Y Roulette of Nelson
The Y roulette is certainly a reasonably obvious shape in those very few cases where the shape is not torn apart, but in all too many examples the torn diagonal of the Y may be mistaken for or misidentified as an oblique roulette, and the upright stalk of the Y may be mistaken for or misidentified as one side of a Square roulette or a H roulette. The Y type may also prove to be difficult to identify when consideration is given to the fact that a Y cut applied upright to the top of stamp is inverted on the adjacent stamp, and that the Y may appear sideways on to the stamp design, in both cases one will see a very different appearance when the stamp is torn apart. There is no doubt that a shape very close to a Y was used as a separation device on a very small number of Chalon stamps, and that some justification exists for listing it as a distinctive separation.
The difficulty in identifying these separations is evident in the certificate above and below. Both were submitted to different expert committees and both were found to have a genuine stamp but different from what they originally thought! And both are very experienced - it can be very hard to determine exactly what separation you have.


*6d Black-brown
"Y" Roulette 18
SG 67h
Perforated 13 of Otago
The obligatory use of postage stamps from 1862 onwards, allied to the rapidly increasing population in the Otago area due to the discovery of Gold, created an increasingly large demand for postage stamps throughout the Colony and especially in Otago. These factors contributed to the decision made by the Dunedin Postmaster, Mr Archibald Barr, to find a successful, cheap and efficient method of separating postage stamps. Enquiries led to the Dunedin printing firm of Messrs. Ferguson & Mitchell who possessed a suitable line perforating machine and were able to take on the work.
The machine was capable of perforating more than one sheet of paper at a time, and that this was done “when the managers of the firm were absent as they may have reduced the payment to the operators of 1d per sheet had they discovered the ease of operation”15 This method of production explains in part why so many of the Perf.13 issues are so poorly centred. There were no marks on the sheets which would have allowed accurate alignment of the underlying sheets during this process, and only practise could have made the final results acceptable. It has to be noted that in real terms the poor results obtained are only poor when judged by philatelists. A recognisable label of the correct colour and value were probably the most important criteria considered necessary by the postal authorities of the period.

*1d Orange-vermilion mint
Perf 13 - SG 68

*1d Carmine-vermilion mint
Perf 13 - SG 69

*1d Orange-vermilion used
Perf 13 - SG 68

1d Carmine-vermilion used
Perf 13 - SG 69
The earliest known use of a Chalon stamp Perf.13 is December 1862, this being either a Davies printing 2d value on large star watermark paper dated December 1862, (this is on an envelope in the Dr Bett collection housed in the Turnbull Library, Wellington, New Zealand), or a Davies printing 6d value on large star watermark paper dated 13 December 1862

2d Slate blue
Unlisted variety - Double Perforations!
Perf 13 - SG 71

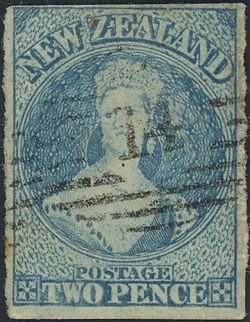
2d Blue mint
Perf 13 - SG 72

2d Blue used
Imperf 3 sides - unopened perfs at bottom
Perf 13 - SG 72

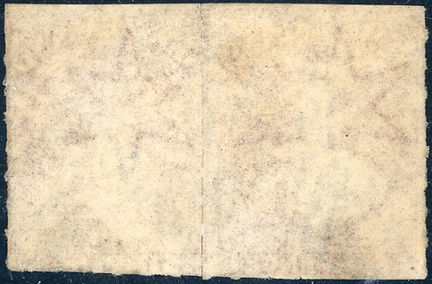
2d Blue used
Back of stamp on right showing
unopened perf holes along bottom.
Perf 13 - SG 72
Collectors should always bear in mind that the differences between the perf. 13 and the perf. 12 1/2 used later are very small, (0.06mm or 0.0024 inches difference in the pin spacing). The vertical perforations on the perf. 12 1/2 issues are found measuring approximately 12., but as the horizontal perforations always measure 12 1/2 it should be simple to avoid confusing the different issues. Nevertheless, great care should be exercised when considering the purchase of Perf. 13 “bargains” as attempts have been made to re-cut Perf 12 1/2 to Perf 13 and vice-versa when there financial benefit.

3d Brown-lilac used
Perf 13 - SG 74

3d Brown-lilac used
Perf 13 - SG 74

6d Black-brown used
Perf 13 - SG 75

6d Brown used
Perf 13 - SG 76

6d Red-brown unused
Perf 13 but perfs unopened on one side - SG 77

1/- Bluish-green used
Perf 13 - SG 78

1/- Dull-green used
Perf 13 - SG 79

1/- Bronze-green used
Perf 13 - SG unlisted

6d Red-brown used
Perf 13 - SG 77

1/- Bluish-green used
Perf 13 - SG 78

1/- Dull-green used
Perf 13 - SG 79

1/- Yellow-green used
Perf 13 - SG unlisted

1/- Deep yellow-green used
Perf 13 - SG 80

1/- Deep yellow-green used
Perf 13 - SG 80